
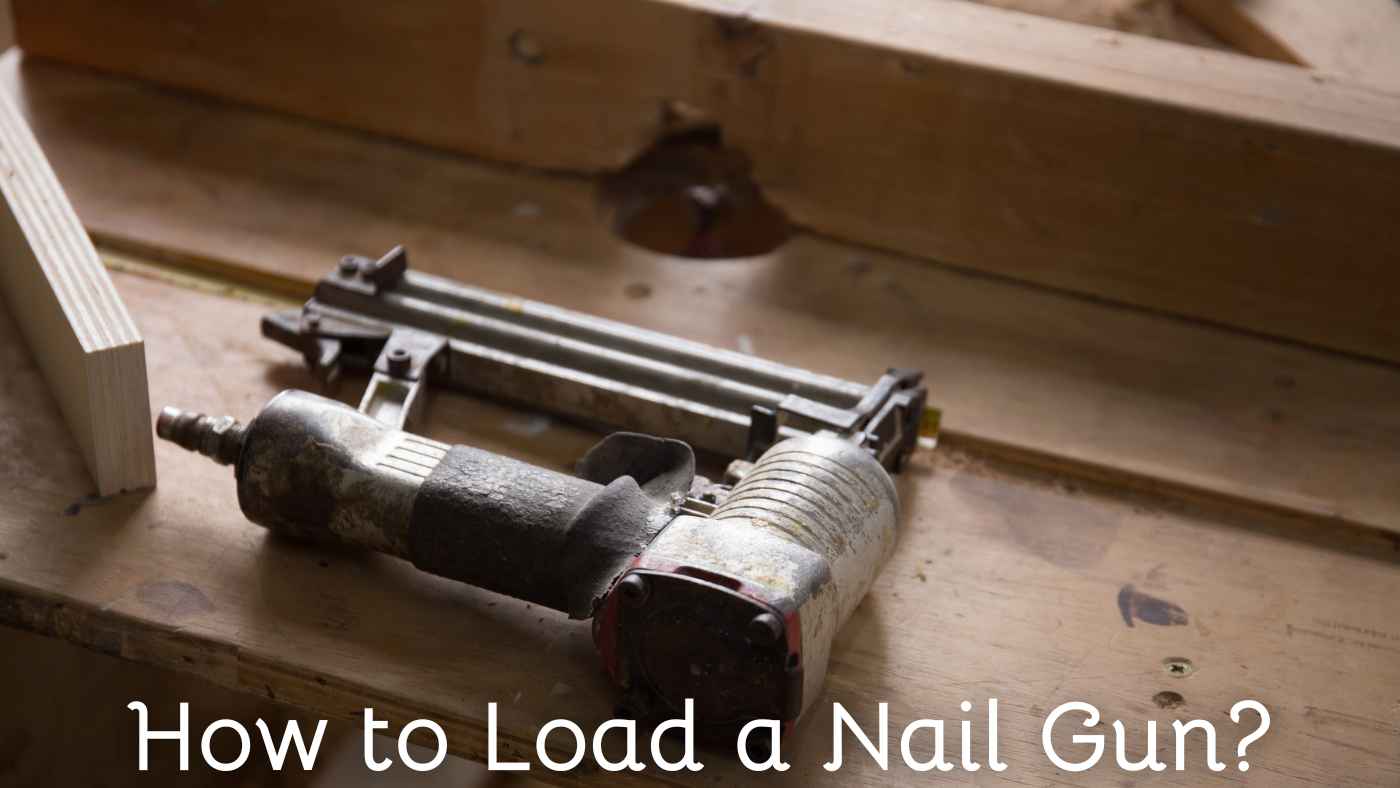
Loading nails into a nail gun is an important task for using it correctly. Each type of nail gun has its own way of loading nails.
It is very important to follow the right steps. Doing this will help the tool work well and safely.
In this guide, you will learn how to load a nail gun in step by step process. These steps will help you avoid problems and get the job done faster.
How to Load a Framing Nail Gun
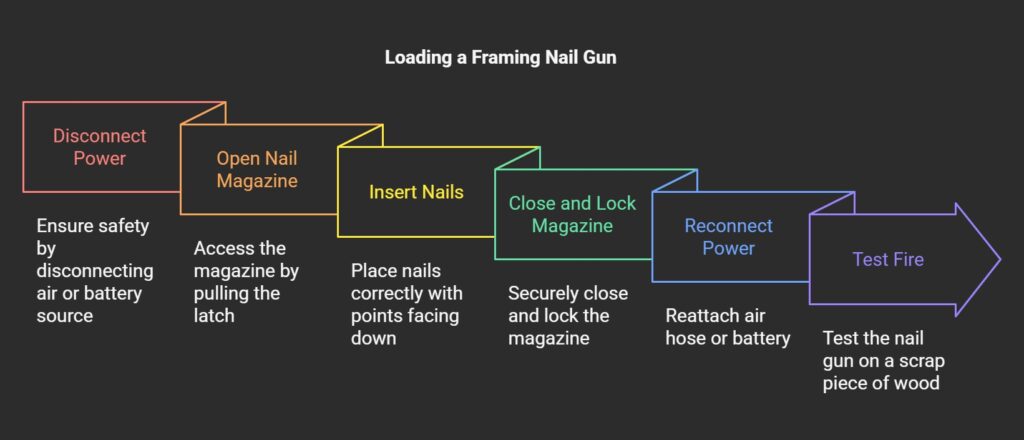
Disconnect the Air Supply or Power Source
Turn off the framing nailer before loading nails. If it is pneumatic, remove the air hose. If it is battery-powered, take out the battery.
This will stop the nail gun from firing by accident. If the nail gun is still connected to power, it can shoot nails suddenly.
That can cause injury. Always make sure the nail gun is off before touching it.
Open the Nail Magazine
Find the magazine latch. It is usually at the back or side of the nailer. Pull it to open the magazine.
Look inside the magazine to see if it is clean. Remove any old nails, dust, or wood pieces.
A dirty magazine can cause nail jams. A clean magazine helps the nail gun work smoothly.
Insert the Nails in the Correct Orientation
If you have a stick nailer, place the nail strip on the rail. Make sure the nail points face downward.
The nail heads should line up with the feed channel. If you have a coil nailer, put the nail coil inside the drum.
Make sure the first nail is in the right place. If the nails are not positioned correctly, the nail gun may not fire properly.
Close and Lock the Magazine Securely
Push the magazine shut after inserting the nails. Keep pushing until you hear a click. This means the magazine is locked.
Check if the magazine is fully closed. If it is not locked, the nails may not feed correctly. This can cause nail jams or misfires. A locked magazine makes sure the nail gun works properly.
Reconnect the Power and Test Fire Safely
After loading the nails, connect the power source again. Attach the air hose or insert the battery.
Before starting work, test the nail gun. Fire a nail into a scrap piece of wood. Check if the nail goes in at the right depth.
If needed, adjust the air pressure or depth settings. Testing the nail gun first will help you avoid problems while working.
How to Load a Brad Nail Gun
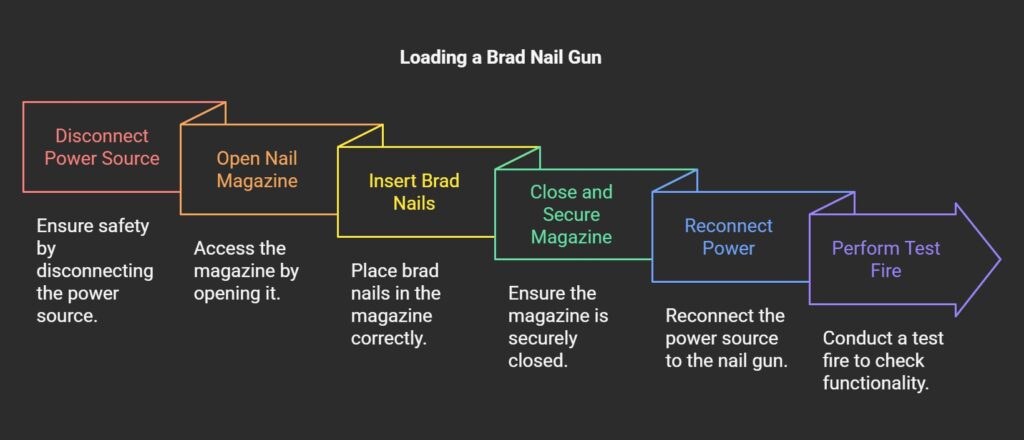
Disconnect the Power Source for Safety
Turn off the brad nailer before loading nails. If it is pneumatic, remove the air hose. If it is battery-powered, take out the battery.
If it is electric, unplug it. This will stop the nail gun from firing by accident. If the nail gun is still connected to power, it may shoot nails suddenly.
That can be dangerous. Always make sure the nail gun is off before touching it.
Open the Nail Magazine
Find the magazine release latch. It is usually at the bottom or the side of the nail gun. Pull the latch to open the magazine.
Some brad nailers open from the side. Some open from the bottom. If you do not know how your nail gun opens, check the manual.
Look inside the magazine. Remove any old nails or dirt. A dirty magazine can cause nail jams. A clean magazine helps the nail gun work better.
Insert the Brad Nails in the Correct Orientation
Brad nails are thin. They are 18-gauge nails with a small head. Place the nails in the magazine carefully. The nail points should face downward.
The nails should be straight and lined up with the rail. If the nails are not in the right position, the gun may jam or fire nails incorrectly.
Always check that you are using the correct nail length. The wrong nails can cause problems.
Close and Secure the Magazine
After inserting the nails, push the magazine shut. Keep pushing until it clicks into place. Check if the magazine is fully locked.
If it is not locked, the nails may not feed properly. That can cause the nail gun to stop working. Some nailers have a spring-loaded system.
Make sure the spring is pressing down on the nails correctly. This will keep the nails in place.
Reconnect Power and Perform a Test Fire
After loading the nails, connect the power source again. Attach the air hose, insert the battery, or plug in the tool.
Before starting your work, test the nail gun. Fire one nail into a scrap piece of wood. Check if the nail goes in at the right depth.
If the nail is too deep or too shallow, adjust the settings. Testing the nail gun first will help you avoid problems while working.
How to Load a Finishing Nail Gun
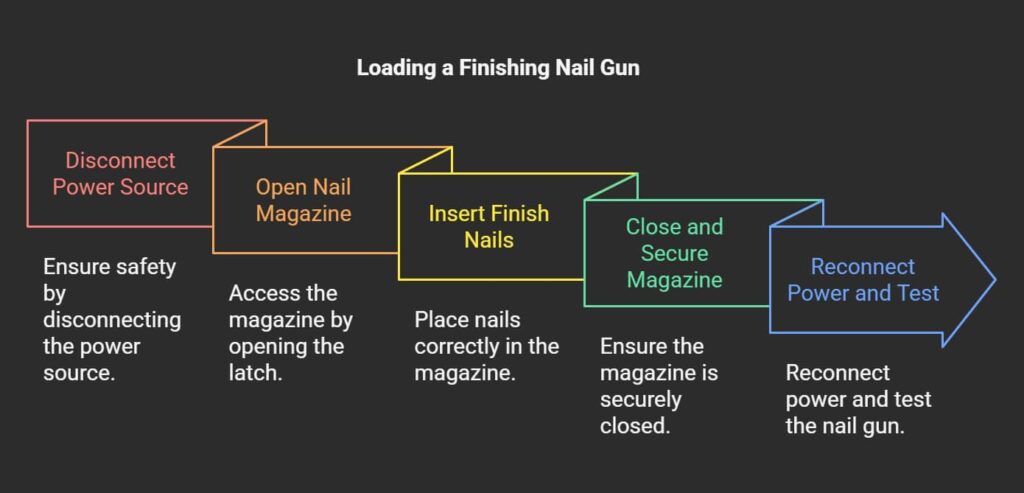
Disconnect the Power Source for Safety
Turn off the finish nailer before loading the nails. If it is pneumatic, remove the air hose. If it is battery-powered, take out the battery.
If it is electric, unplug it. This will make sure the nail gun does not fire by accident. If the nail gun is still connected to power, it may shoot nails suddenly.
That can be very dangerous. Always check that the nail gun is off before touching it.
Open the Nail Magazine
Find the magazine release latch. It is usually on the back or the side of the nail gun. Pull the latch to open the magazine.
Some finish nailers have straight magazines. Some have angled magazines. Check the manual if you are not sure which type you have.
Look inside the magazine. Remove any old nails or dirt.
A dirty or blocked magazine can stop the nailer from working properly. Keeping it clean will help prevent nail jams.
Insert the Finish Nails in the Correct Position
Finish nails are thicker than brad nails. They are 15 or 16-gauge. Place the nails inside the magazine carefully.
The nail points should be facing downward. If you are using an angled finish nailer, place the nails at the same angle as the magazine.
If the nails are not lined up correctly, the gun may jam or fire nails the wrong way.
Always check that you are using the correct size of nails. If you use the wrong nails, the gun may not work.
Close and Secure the Magazine
After inserting the nails, push the magazine shut. Keep pushing until you hear a click. This means the magazine is locked.
If the magazine is not locked, the nails may not move forward properly. That can make the nail gun stop working.
Some nailers have a spring inside the magazine. Make sure the spring is pressing down on the nails the right way. This will help the nails feed smoothly.
Reconnect the Power and Perform a Test Fire
After loading the nails, connect the power again. Attach the air hose, insert the battery, or plug in the tool. Before starting your project, test the nail gun.
Fire one nail into a scrap piece of wood. Check if the nail goes in at the right depth. If the nail is too deep or too shallow, adjust the settings.
Testing the nail gun first will help you work better and avoid mistakes.
How to Load a Roofing Nail Gun
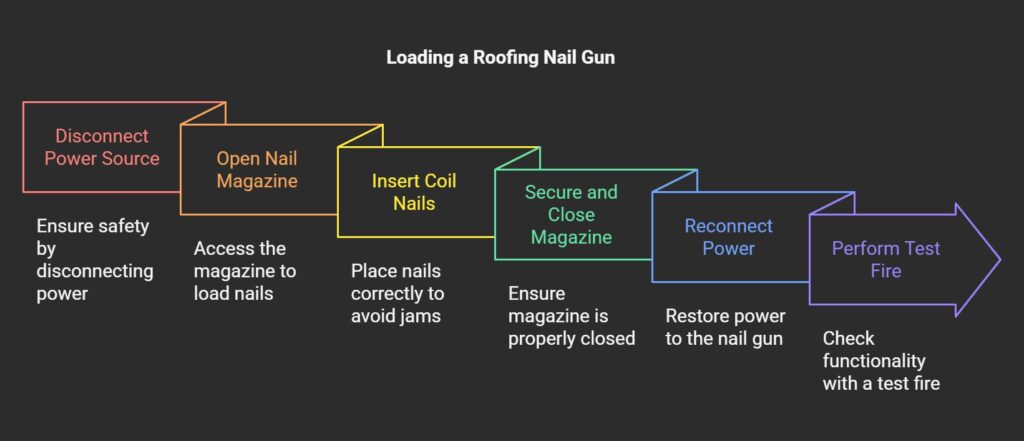
Disconnect the Power Source for Safety
Always disconnect the power before loading nails into your roofing nailer. If it is a pneumatic model, remove the air hose.
If it is gas-powered or battery-operated, take out the battery or fuel cell. This is important to avoid accidents.
If the nailer is connected to power, it may fire by accident when you touch it. Always check that the tool is off before handling it.
Open the Nail Magazine
Roofing nailers use coil nails. These nails come in big rolls to hold many nails. To open the magazine, find the release mechanism.
It is usually on the top or side of the nailer. Pull the release to open the magazine. Roofing nailers often use a coiled drum, so load it carefully to make sure the nails feed correctly.
Before putting in the new nails, check the magazine for dirt or old nails.
Insert the Coil Nails Correctly
Roofing nailers need coil nails. Place the coil of nails inside the magazine. Make sure the nails are aligned the right way.
The pointed ends should face outward. The heads of the nails should be placed in the feed area.
If the nails are not placed correctly, the nailer may jam or not fire the nails properly.
Secure and Close the Magazine
After putting the coil nails in place, close the magazine tightly. If the magazine has a coil, make sure it is locked into position.
The nail feed mechanism should engage properly. If the magazine has a spring, make sure it is pressing on the nails correctly to push them forward.
If the magazine is not closed properly, the tool may misfire or jam.
Reconnect Power & Perform a Test Fire
Once the nails are loaded and the magazine is closed, reconnect the power.
Attach the air hose, insert the battery, or put it in the fuel cell.
Before starting your work, test the roofing nailer by firing a few nails into a scrap piece of wood.
Check if the nails are feeding well and sinking into the wood at the right depth. Adjust the depth control if needed.
How to Load a Siding Nail Gun
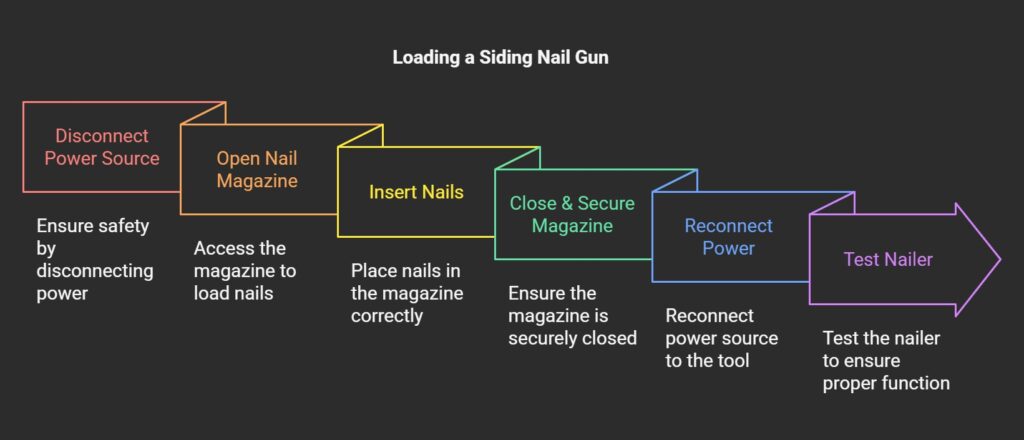
Disconnect the Power Source for Safety
Before you load the nails, always disconnect the power. For pneumatic nailers, unplug the air hose.
For battery-powered models, remove the battery. This ensures the tool is off and will not fire accidentally when you handle the magazine.
It is important to make sure the tool is inactive to keep you safe.
Open the Nail Magazine
Look for the magazine release latch on the side or bottom of the tool. Slide the magazine open.
Siding nailers can have side-loading or bottom-loading magazines, so check your model.
Before inserting new nails, check the magazine for any leftover nails or debris.
This keeps the tool from jamming and ensures it works smoothly.
Insert the Nails in the Correct Orientation
Siding nailers can use coil nails or stick nails, depending on the model. For coil nails, place them in the magazine with the pointed ends facing down and the heads lined up with the feed mechanism.
For stick nails, insert them with the points down along the magazine rail. Make sure you are using the correct size and type of nails for your siding nailer.
Close & Secure the Magazine
Once the nails are placed, close the magazine tightly. Make sure the magazine locks into place and is securely shut.
If the magazine is not fully closed, the nails may not feed properly, or they may fall out. Always check that the magazine is locked before turning the power back on.
Reconnect Power & Test the Nailer
After loading the nails and closing the magazine, reconnect the power. Attach the air hose, reinsert the battery, or plug in the power cord.
Test the siding nailer by firing a few nails into a scrap piece of siding. This will check if the nails are feeding properly and that the tool is working well.
Adjust the depth settings if needed to make sure the nails go in the correct depth for the material.
How to Load a Pin Nail Gun
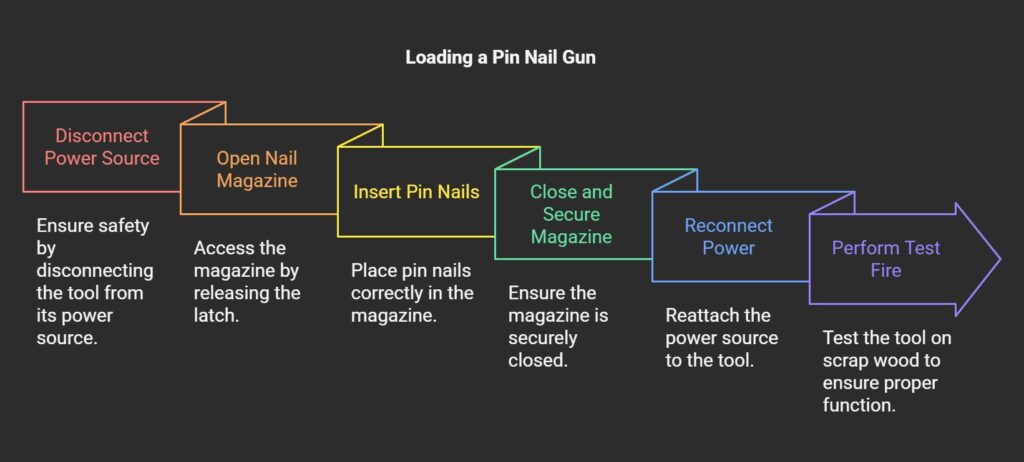
Disconnect the Power Source for Safety
Before you load the nails, always disconnect the pin nailer from its power.
If you are using a pneumatic pin nailer, unplug the air hose.
For battery-powered models, remove the battery. This is very important because pin nailers shoot small, headless nails.
Even an accidental firing can be dangerous, so make sure the tool is off before handling it.
Open the Nail Magazine
Look for the magazine release latch, usually found on the side or bottom of the nailer. Slide or pull the latch to open the magazine.
The magazine holds the thin, 23-gauge nails in a straight line.
Make sure the magazine is clean and free from any leftover nails or debris before loading new nails. This will help prevent any jams.
Insert the Pin Nails in the Correct Orientation
Carefully align the pin nails along the magazine rail. The pointed ends should be facing down. Make sure the nails are placed properly.
Pin nails are very small and headless, so they need to be positioned just right to avoid jamming. Always use the correct size of nails for your specific pin nailer.
Close and Secure the Magazine
Once the nails are inserted, slide the magazine shut. It should click into place. Make sure the magazine is closed tightly.
If the magazine is not securely shut, the nails may misfeed or jam. Since pin nails are very thin, any small misalignment can cause problems with the tool.
Reconnect Power and Perform a Test Fire
After you load the nails and close the magazine, reconnect the power. Attach the air hose or reinsert the battery.
Test fire the pin nailer on a scrap piece of wood to check the nail feeding and depth control.
If the nails are not driving correctly, adjust the depth settings to make sure they go in the right depth without going too deep.
How to Load a Flooring Nail Gun

Disconnect the Power Source for Safety
Before loading nails, always disconnect the flooring nailer from its power source. If it is a pneumatic model, detach the air hose.
For battery-powered or manual models, make sure the tool is turned off or the battery is removed.
Flooring nailers use a lot of force to drive nails or staples. This step helps prevent accidental firing, which can be dangerous.
Open the Nail Magazine or Staple Channel
Find the magazine release latch on the side or bottom of the tool. Slide or flip open the magazine.
Flooring nailers use L-cleats, T-cleats, or staples, depending on the model. Check your tool’s manual to make sure you are using the correct fastener.
Make sure the magazine is free of dust or old nails before loading new fasteners.
Insert the Nails or Staples in the Correct Orientation
If you are using L-cleats or T-cleats, place them in the magazine with the head facing upward and the pointed tip facing downward.
If you are using staples, make sure they are placed properly in the staple channel.
Always use the right type and size of fasteners for your flooring nailer. Using the wrong fasteners can cause jams or misfires.
Close and Secure the Magazine
After loading the nails or staples, slide the magazine shut. Make sure the magazine locks into place.
Some flooring nailers have a spring mechanism that keeps pressure on the fasteners.
Check that this mechanism is working. If the magazine is not fully closed, it can cause problems like misfeeds or damage to the tool.
Reconnect Power and Perform a Test Fire
Once the nails or staples are loaded and the magazine is secured, reconnect the air hose, battery, or power source.
Before starting your flooring project, test the tool by firing a few fasteners into a scrap piece of flooring.
This will check if the fasteners are feeding correctly and driving in the right depth.
Adjust the air pressure or depth settings if needed to ensure the fasteners do not damage the flooring.
How to Load a Palm Nailer
Connect the Air Supply or Power Source
Palm nailers do not have a magazine for nails. They drive one nail at a time. To start, connect the air hose to pneumatic models.
If you have a cordless model, make sure the battery is fully charged.
It is important to have the right air pressure, which is usually between 50 and 120 PSI. This ensures the nailer works smoothly.
Select the Correct Nail Type
Palm nailers are made to use loose nails, not collated strips or coils. Choose the right nail size for your project.
Palm nailers can usually handle nails from 1.5 inches to 6 inches long. If you use the wrong nail type, the nail may not go in properly, or the tool might jam.
Insert the Nail into the Magnetic Tip
Take one nail and place it into the magnetic tip of the palm nailer. The magnet will hold the nail in place. Make sure the nail is straight and centered.
If the nail is not placed correctly, it could bend or not go in straight when fired.
Position the Nailer and Apply Pressure
Hold the palm nailer directly over the target area. The nail tip should be flush against the surface. Apply steady pressure to start the firing process.
Once you apply pressure, the palm nailer will automatically begin hammering the nail into the material.
Drive the Nail and Repeat as Needed
Keep the palm nailer steady as it drives the nail into the material. When the nail is fully in place, stop applying pressure to stop the hammering.
If you need to drive more nails, adjust your grip and position the nailer for the next nail. Each nail has to be placed manually since the palm nailer does not have a magazine.
Precautions Before Loading Nails Into Nail Guns
Disconnect the Power Source (Air, Battery, or Gas)
Always turn off the nail gun before touching it. Remove the power to stop it from firing by accident. If it is a pneumatic nailer, unplug the air hose.
If it is battery-powered, take out the battery. If it is gas-powered, remove the fuel cell.
This will make sure the nail gun does not fire while you are handling it. Accidental firing can cause serious injury.
Wear Proper Safety Gear
Always wear safety glasses or goggles to protect your eyes. Nails or small wood pieces can fly into your eyes. Wear gloves to protect your hands from sharp nails and rough parts.
If the nail gun is very loud, wear ear protection. Loud noises can damage your hearing over time. Safety gear helps keep you safe from injury.
Inspect the Nail Gun for Damage or Wear
Look at the nail gun carefully before using it. Make sure nothing is broken. Check for loose parts, cracks, or leaks.
Test the trigger to see if it works properly. Look at the magazine to see if it is clean.
If anything looks damaged, do not use the nail gun.
A broken nail gun can jam or misfire. This can hurt you or damage your project.
Use the Correct Nails for Your Nail Gun
Different nail guns use different nails. Some use long nails. Some use short nails. Some use coil nails.
Some use striped nails. Read the instructions for your nail gun. Make sure you are using the right nails.
If you use the wrong nails, the nail gun may not work.
It can jam or fire nails the wrong way. This can break the nail gun or cause injuries.
Check for Obstructions in the Nail Magazine
Before putting in new nails, look inside the magazine. Make sure there are no old nails stuck inside.
Check for dust or small pieces of wood. If the magazine is not clean, the nails may not move properly.
This can cause jams or misfires. If you see anything stuck inside, remove it before loading new nails.
Test the Safety Mechanism Before Use
Most nail guns have a safety feature. This stops them from firing by accident. Before loading nails, test the safety features.
Press the tip of the nail gun against a surface. Do not pull the trigger. The nail gun should not fire.
If the safety does not work, do not use the nail gun. A broken safety feature can cause serious accidents.
Load Nails in a Stable Position
Do not load nails while standing in a bad position. Do not load nails while holding the gun in the air. Place the nail gun on a flat surface.
Hold it steady. Use both hands if needed. If the nail gun is moving, you may drop it.
You may also hit the trigger by accident. A stable position makes loading nails safer and easier.
Conclusion
In conclusion, loading nails in different nail guns is a simple task when you follow the right steps. Each type of nail gun has its own way of loading nails. It is important to disconnect the power source before starting.
Always make sure the nails are placed correctly in the magazine. Once you load the nails, test the tool to make sure it works. Proper loading will make your work easier and prevent jams or misfires.
FAQs
What should I do if the nails are not feeding properly?
Ans: If the nails are not feeding, check for jams or dirt in the magazine. Make sure the nails are placed right. Clean the magazine if needed.
What if the magazine won’t close after loading nails?
Ans: If the magazine won’t close, check if the nails are lined up and seated correctly. Look for dirt or worn-out parts. Clean or replace any broken parts.
How do I fix a nail gun that leaks air or loses power after loading nails?
Ans: For air tools, check if the air hose is loose or has any cracks. For battery-powered tools, make sure the battery is in the right place and fully charged.
Can I load nails into a palm nailer?
Ans: No, you cannot load nails into a palm nailer. You need to insert each nail by hand before using the tool.