
Hardwood flooring makes any room feel warm, stylish, and strong. However, installing it without the right tools can be slow and frustrating.
That’s where a hardwood flooring nail gun helps make the job quicker, easier, and keeps your floorboards firmly in place for years.
Whether you are a DIYer or a pro, picking the right nail gun can make a big difference.
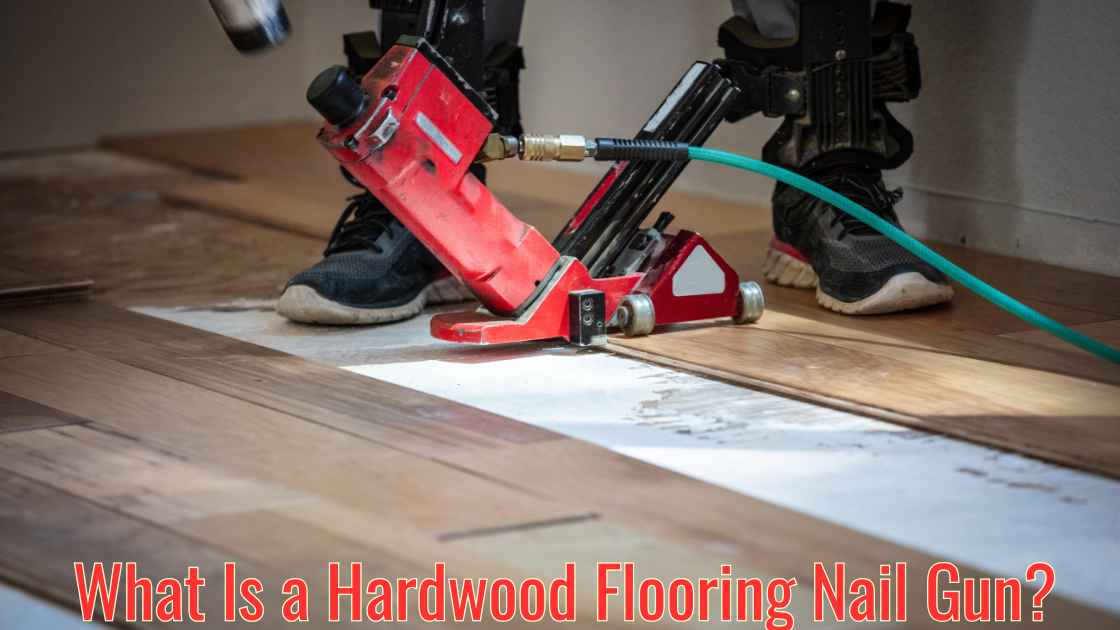
What is a Hardwood Flooring Nail Gun
A hardwood flooring nail gun is a special tool that quickly and accurately attaches floor planks to the subfloor.
Unlike regular nail guns, it drives nails at an angle through the tongue of tongue-and-groove flooring, keeping them hidden for a smooth and professional look.
These nailers use cleats or staples. Cleats let the wood move naturally, to make them great for solid hardwood.
Staples provides a stronger hold, which is better for engineered wood.
There are three main types: pneumatic (powered by air and best for big projects), manual (requires hitting with a mallet for control but takes more effort), and cordless (battery or gas-powered for easy movement).
A key feature is the base plate. It helps place the nails correctly and prevents damage to the wood.
For both professionals and DIYers, a flooring nail gun speeds up installation and provides a strong hold without visible nails.
Here is why a flooring nail gun is essential:
- Precision & Strength: Prevents flooring from shifting over time.
- Efficiency: Speeds up installation, saving hours of manual hammering.
- Minimized Damage: Reduces the risk of splitting or overdriving nails.
Types of Hardwood Floor Nailing Guns
Choosing the right nail gun for installing hardwood flooring can make a big difference in the quality of the job and how smoothly the project goes.
Here are the main types of flooring nailers:
Manual Flooring Nailers
- How They Work: Manual flooring nailers are tools you operate by hand, using a rubber mallet to drive nails into the flooring.
- Best for Small Projects: These nailers are perfect for small jobs or DIY projects. They perform well in tighter spaces like bedrooms or bathrooms.
- Control and Precision: One of the biggest benefits of manual nailers is how much control they give you. You can easily adjust the pressure on the nails to ensure a precise fit and reduce the chance of damaging the wood. They are great for delicate or detailed work.
- Limitations: They require more physical effort and take longer than powered options. They may not be ideal for larger projects where speed is important.
Pneumatic Flooring Nailers
- How They Work: Pneumatic flooring nailers use compressed air to automatically fire nails. It is a fast and efficient choice for flooring installation.
- Ideal for Large Projects: These nailers are best for big installations, like in commercial spaces or large areas of a home. Professionals often prefer them because they work quickly and powerfully. They provide high-quality results in less time.
- Speed, Power, and Consistency: Pneumatic nailers fire nails rapidly and consistently, which helps avoid misalignment. This is especially helpful when working with harder woods. The manual effort might not be enough in this case.
- Considerations: While pneumatic nailers can be pricier initially because you need an air compressor, they often pay off in the long run.
Staplers & Cleat Nailers
- Cleat Nailers: Cleat nailers are designed to drive cleat nails specifically for solid hardwood flooring. These nails allow the wood to expand and contract naturally. They are a great choice for areas with changing humidity. The cleat design ensures a secure hold while allowing for wood movement and reducing the risk of cracking or warping.
- Staplers: In contrast, staplers use staples to secure the flooring. While they provide a tighter grip, they can limit the wood’s ability to move naturally. This can lead to problems over time, like cracking or buckling in humid environments.
- Choosing Between the Two: The decision between cleat nailers and staplers depends on the type of hardwood flooring you’re installing. Cleat nailers are typically better for solid hardwood, while staplers might be more suitable for engineered wood or when extra grip is needed.
Key Features of a Nail Gun for Harwood Flooring
Hardwood flooring nail guns are specifically designed for installing hardwood floors efficiently and securely.
Here are the key features of this nailer:
Type of Nails
Make sure the nail gun works with nails that are between 1.5 to 2.5 inches long, as these are commonly used for hardwood flooring.
Type of Fasteners Used
- Uses cleats or staples to secure hardwood planks.
- Cleats provide better flexibility. It allows for wood expansion and contraction.
- Staples offers a stronger initial grip but may cause splitting in some hardwoods.
Angled Magazine
- Typically 45 degree angled to allow precise fastening into the tongue of the hardwood plank.
- Ensures a secure hold without damaging the surface.
Adjustable Depth Control
Allows users to set the depth of the fastener to prevent over or under nail penetration.
Ergonomic Handle & Grip
- Designed for extended use without fatigue.
- Rubberized grip for better comfort and control.
Interchangeable Base Plates
- Different base plates accommodate based on the hardwood’s thicknesses.
- Helps prevent damage to the wood surface.
Non Marring Footplate
Prevents scuffing or denting of the hardwood planks.
High Driving Power
Delivers strong force to penetrate dense hardwoods like oak, maple, or hickory.
Mallet Activation (for Manual Models)
A rubber mallet is used to strike the actuator to ensure proper nail placement.
Compatibility with Flooring Thickness
Supports 3/8-inch to 3/4-inch hardwood flooring thickness depending on the model.
Nail Sizing Considerations for a Nail Gun for Hardwood Floors
Nail Types
Cleat Nails (L-shaped or T-shaped)
- Better for solid hardwood due to flexibility, allowing wood to expand and contract.
- Reduces the risk of splitting, making them ideal for dense woods like oak and maple.
- Typically used with flooring cleat nailers.
Staples
- Stronger initial grip but can cause splitting in some hardwoods.
- Better suited for engineered hardwood or plywood subfloors.
- Typically used with flooring staplers rather than nailers.
Nail Gauge
16-gauge cleats
- Ideal for most solid hardwoods (e.g., oak, maple, hickory).
- Provides strong holding power while allowing for some flexibility.
18-gauge cleats
- Used for thinner or softer hardwood floors like bamboo or engineered hardwood.
- Reduces the risk of splitting while still providing adequate hold.
Nail Length
- Standard lengths range from 1-½” to 2”.
- The general rule: The nail should penetrate the subfloor at least ¾ inch.
- Recommended nail lengths based on flooring thickness:
- 3/4″ thick hardwood → Use 2″ nails
- 1/2″ thick hardwood → Use 1-½” nails
- 3/8″ thick hardwood → Use 1-¼” nails
Nail Spacing
- Every 6-8 inches along the length of each board.
- Start 1-3 inches from the end of each board to prevent splitting.
Pros and Cons of Hardwood Nail Gun
| Pros | Cons |
| Speeds up the flooring process significantly. | Requires air compressor for pneumatic models. |
| Cleats allow for wood expansion and prevent warping. | Designed mainly for tongue-and-groove hardwood flooring. |
| Ensures nails are driven at the correct 45° angle. | Professional models are expensive. |
| Non-marring footplates protect the flooring surface. | Requires some experience to control depth and angle. |
| Pneumatic and cordless models reduce user fatigue. | Can be tiring to use for long hours |
| Supports 3/8″ to 3/4″ planks. | More rigid hold but may damage dense wood. |
Common Uses of a Hardwood Nail Gun
Installing Tongue-and-Groove Hardwood Flooring
Drives cleats or staples at a 45 degree angle into the tongue of hardwood planks for a secure fit.
Securing Solid Hardwood Floors
Ideal for 3/4-inch solid hardwood planks to ensure a strong hold while allowing natural expansion and contraction.
Engineered Hardwood Installation
Works with engineered hardwood, though staples are often preferred over cleats.
Ensuring Even Flooring Alignment
Helps keep floorboards properly aligned during installation by securing them tightly.
Faster and More Efficient Flooring Projects
Increases productivity compared to hand-nailing, which makes it ideal for large flooring jobs.
Subfloor Attachment
Can sometimes be used to attach plywood subfloors before installing hardwood planks.
Maintenance of Hardwood Nail Guns
Regular Cleaning
- Wipe down the exterior after each use to remove dust and debris.
- Use compressed air to clean the magazine and the firing mechanism.
- Remove jammed nails promptly to avoid internal damage.
Lubrication
- Apply a few drops of pneumatic tool oil daily for air-powered models.
- Electric and cordless models require periodic lubrication of moving parts.
- Avoid over-lubrication, as excess oil can attract dirt.
Checking Air Pressure (For Pneumatic Nail Guns)
- Maintain the recommended PSI (usually 70-120 PSI).
- Avoid excessive pressure to prevent internal wear.
- Use an air filter and water trap to prevent moisture buildup.
Inspecting the O-rings and Seals
- Check for cracks or leaks in rubber seals.
- Replace worn-out O-rings to maintain air pressure efficiency.
Battery and Fuel Cell Maintenance (For Cordless Nail Guns)
- Keep lithium-ion batteries charged but avoid overcharging.
- Store fuel cells in a cool, dry place and check expiration dates.
Checking Fasteners and Magazine
- Use the correct nail size and type for hardwood applications.
- Inspect the magazine for wear or damage.
Storing Properly
- Store in a dry, cool place to prevent rust.
- Use a protective case for transportation.
Periodic Tune-Ups
- Check the trigger mechanism and safety features.
- Tighten loose screws and connections.
- If performance declines, consider professional servicing.
Common Troubleshooting Issues & Fixes for Hardwood Nail Guns
If your hardwood nail gun isn’t working right, don’t worry.
Here are some common problems and simple fixes:
Nail Gun Won’t Fire
Why It Happens
- Not enough air pressure (for air-powered nail guns).
- Battery is low or dead (for cordless nail guns).
- A nail is stuck inside.
- The safety tip is not fully pressed against the wood.
How to Fix It
- Check and adjust the air pressure.
- Charge or replace the battery.
- Clear any stuck nails from the gun.
- Make sure the nail gun is pressed firmly against the wood before pulling the trigger.
Nails Aren’t Sinking into the Wood
Why It Happens
- Air pressure or power is too low.
- Using the wrong nail size.
- The nail gun’s pin is dull or worn out.
How to Fix It
- Increase air pressure, but don’t go over the limit.
- Make sure you are using the right nail size for hardwood.
- If the firing pin looks dull or damaged, replace it.
Nail Gun Shoots More Than One Nail at a Time
Why It Happens
- The trigger is worn out or not working right.
- The gun is in rapid-fire mode, and you are holding the trigger too long.
How to Fix It
- Switch to single-shot mode if your nail gun has it.
- Replace the trigger if the problem keeps happening.
Nails Keep Getting Stuck
Why It Happens
- Using cheap or incorrect nails.
- Dust and dirt inside the nail slot.
- The part that pushes nails forward is worn out.
How to Fix It
- Use high-quality nails that match your nail gun.
- Clean out any dust and debris from the nail slot.
- Check the nail feeder for damage and replace it if needed.
Air is Leaking
Why It Happens
- The rubber seals inside the gun are damaged.
- The air hose is not connected properly.
How to Fix It
- Check for worn or cracked rubber seals and replace them.
- Tighten the air hose and make sure it is properly connected.
Nail Gun Skips or Misfires
Why It Happens
- Not enough air pressure.
- The trigger is worn out.
- The nail holder is bent or not lined up correctly.
How to Fix It
- Increase air pressure to the right level.
- Replace the trigger if it feels loose or unresponsive.
- Check the nail holder and make sure it’s straight and secure.
Conclusion
A hardwood flooring nail gun is a must-have tool that makes installing floors easier and ensures a strong finish.
Whether you are tackling a DIY project or working as a pro, picking the right nail gun, and using it correctly will help you get smooth, high-quality results.
FAQs
Can You Use a Regular Nail Gun for Hardwood Floors?
Ans: No, a regular nail gun is not suitable for installing hardwood floors.
Regular nail guns shoot nails straight, while flooring nailers drive nails at a specific angle.
Using a regular nail gun can split hardwood planks or leave visible marks.
What is the difference between nailing and gluing hardwood floors?
Ans: Nailing attaches planks with nails. This method allows for some movement and is easier to repair.
Gluing uses adhesive to bond the planks to the subfloor.
This creates a rigid connection, which dampens sound but makes repairs harder. Nailing is usually faster and cheaper than gluing.
Do you nail hardwood flooring in the tongue or groove?
Ans: You should nail hardwood flooring through the tongue of the plank.
This hides the nails and gives a clean appearance. It also lets the wood expand and contract.
Do not nail through the groove, as this can weaken the connection between the planks.